
2015年2月5日木曜日
Dropwizard-JAXWSのサンプルを動かす(メモ)
Dropwizard-JAXWSのサンプルを動かすまでにつまづいたのでメモ.
'javax.xml.accessExternalSchema'の指定がない場合は'dropwizard-jaxws-example'の段階で以下の問題でと失敗する.
とりあえずこれで解決した.
ちなみにWSDLを表示するにはサービスに'?wsdl'をつける.
- ルートディレクトリに移動('dropwizard-jaxws', 'dropwizard-jaxws-example'が見える,githubからzip downloadした場合は'dropwizard-jaxws-master'ディレクトリ)
mvn install -Djavax.xml.accessExternalSchema=all
'javax.xml.accessExternalSchema'の指定がない場合は'dropwizard-jaxws-example'の段階で以下の問題でと失敗する.
accessExternalSchemaプロパティで設定された制限により'file'アクセスが許可されていないため、スキーマ・ドキュメント'xjc.xsd'の読取りに失敗しました。
ちなみにWSDLを表示するにはサービスに'?wsdl'をつける.
http://localhost:8080/soap/simple?wsdl
2015年1月20日火曜日
MacOSXのアプリのスタイルを使用してシェルスクリプトを実行します (例としてJavaApplicationStub劣化版)
タイトルの通りのプロジェクトをGitHubに作ってみた.
注意
- 環境 MacOSX 10.10.1 / Java 1.8.0_25
- Finder上で,"〜.app"のフォルダ"入る際は,コンテクストメニュー(副(右)クリックで出るメニュー)の「パッケージの内容を表示」を用いる.
- "ShellCommand_MacApp.app"をダブルクリックした際に「開発元が未確認のため開けません」とでることがある.コンテクストメニュー(副(右)クリックで出るメニュー)の「開く」で起動すると確認ダイアログで確認されたのちに起動させることができる.
作成
- build.xmlをエディタで開き,"javahome"のプロパティ値を環境に合わせて修正する.
- antを実行する.
- ShellCommand_MacApp.app/Contents/Resources/Java/の下にShellCommand_MacApp.jarファイルができる
- ShellCommand_MacApp.appをダブルクリックして起動する.
動作
- Windowが一つでる.
- Dock内のアイコンを確認してみる.
- Dock内のアイコン上のバッジを確認してみる.

- メニューの"ShellCommand_MacApp / About ShellCommand_MacApp"を選択してみる.
- メニューの"ShellCommand_MacApp / Preferences…"を選択してみる.
- メニューの"ShellCommand_MacApp / Quti ShellCommand_MacApp"を選択してみる.

2015年1月19日月曜日
rJavaを用いたヒストグラム画像生成と,その画像によるパラパラ漫画
前回の「Rの作図によるパラパラ漫画」用のクラス(RBase)を用意して,それの拡張(RSample)で実行する形にしてみた.
実行のためのパラメータ類についてはrJavaを用いてJavaからRを動かしたPostと同様にR_HOME等を設定する.
(ファイルにPNG画像を書き出して読み込んで描画するを繰り返すので注意)
実行のためのパラメータ類についてはrJavaを用いてJavaからRを動かしたPostと同様にR_HOME等を設定する.
(ファイルにPNG画像を書き出して読み込んで描画するを繰り返すので注意)
結果
2015年1月18日日曜日
2015年1月11日日曜日
math/RでPlotをrJava経由でやってみる(SVG)
rJavaを用いてJavaからRを動かしたPostのRSampleと入れ替えてみる.

結果
<html><body>

<svg xmlns="http://www.w3.org/2000/svg" xmlns:xlink="http://www.w3.org/1999/xlink" width="504pt" height="504pt" viewBox="0 0 504 504" version="1.1">
<defs>
<g>
<symbol overflow="visible" id="glyph0-0">
<path style="stroke:none;" d="M 0.390625 0 L 0.390625 -8.609375 L 7.21875 -8.609375 L 7.21875 0 Z M 6.140625 -1.078125 L 6.140625 -7.53125 L 1.46875 -7.53125 L 1.46875 -1.078125 Z M 6.140625 -1.078125 "/>
</symbol>
…
<path style="fill:none;stroke-width:0.075;stroke-linecap:round;stroke-linejoin:round;stroke:rgb(74.509804%,74.509804%,74.509804%);stroke-opacity:1;stroke-miterlimit:10;" d="M 59.039062 416.800781 L 473.761719 416.800781 "/>
</g>
</g>
</svg>

</body></html>

参考
math/RでPlotをrJava経由でやってみる
rJavaを用いてJavaからRを動かしたPostのRSampleと入れ替えてみる.

結果
<html><body><img src="data:image/png;base64,iVBORw0KGgoAAAANSUhEUgAAAeAAAAHgCAYAAAB91L6VAAAD8GlDQ1BJQ0MgUHJvZmlsZQA
…
IgAALGEUADbJzLUGAQAAEQAIEoEEADHAUvog4gAAIgAALGEfj/xnxImx+sxQYAAAAASUVORK5CYII="></body></html>

参考
2015年1月10日土曜日
math/Rで度数分布表をrJava経由でやってみる
前々回のRSampleと入れ替えてみる.
結果
R_HOME:/usr/local/Cellar/r/3.1.2/R.framework/Versions/3.1/Resources
java.library.path:.:/usr/local/Cellar/r/3.1.2/R.framework/Versions/3.1/Resources/library/rJava/jri
label=[0,6) freq=0.0 ratio=0.0
label=[6,12) freq=19.0 ratio=1.9E-4
label=[12,18) freq=1394.0 ratio=0.01394
label=[18,24) freq=12456.0 ratio=0.12456
label=[24,30) freq=36287.0 ratio=0.36287
label=[30,36) freq=35818.0 ratio=0.35818
label=[36,42) freq=12658.0 ratio=0.12658
label=[42,48) freq=1340.0 ratio=0.0134
label=[48,54) freq=28.0 ratio=2.8E-4
label=[54,60) freq=0.0 ratio=0.0
sigma1=0.72105
sigma2=0.97219
sigma3=0.99953
参考
math/Rでの関数モデルの当てはめをrJava経由でやってみる
前回のRSampleと入れ替えて,データファイル(dist.dat)を用意してみる.
src/rJava/RSample.java
dist.dat
src/rJava/RSample.java
dist.dat
0,22
1,25
2,28
3,19
4,20
5,18
6,18
7,12
8,15
9,11
10,22
11,16
12,19
13,22
14,18
15,10
16,16
17,11
18,11
19,11
20,10
21,15
22,12
23,10
24,10
25,11
26,12
27,10
28,7
29,8
30,10
31,11
32,9
33,6
34,9
35,10
36,11
37,6
38,5
39,6
40,8
41,10
42,15
43,7
44,5
45,3
46,4
47,2
48,5
49,9
50,3
51,7
52,6
53,5
54,5
55,1
56,7
57,5
58,5
59,4
60,3
61,2
62,2
63,7
64,4
65,4
66,9
67,5
68,7
69,6
70,6
71,2
72,2
73,2
74,3
75,2
76,1
77,2
78,4
79,1
80,3
81,1
82,3
83,3
84,4
85,2
86,4
87,6
88,0
89,7
90,3
91,3
92,3
93,2
94,8
95,0
96,0
97,2
98,3
99,3
100,4
101,5
102,1
103,3
104,3
105,1
106,3
107,3
108,0
109,3
110,4
111,1
112,2
113,0
114,3
115,2
116,0
117,2
118,2
119,0
120,1
121,1
122,2
123,1
124,2
125,2
126,3
127,3
128,0
129,1
130,3
131,1
132,4
133,2
134,0
135,1
136,1
137,1
138,2
139,1
140,1
141,0
142,2
143,0
144,0
145,0
146,2
147,0
148,0
149,0
150,2
151,0
152,0
153,0
154,0
155,4
156,1
157,0
158,0
159,1
160,1
161,1
162,1
163,0
164,0
165,0
166,1
167,1
168,1
169,1
170,1
171,0
172,0
173,0
174,0
175,1
176,0
177,0
178,0
179,0
180,0
181,2
182,1
183,0
184,1
185,2
186,0
187,0
188,0
189,0
190,0
191,0
192,1
193,2
194,0
195,0
196,1
197,0
198,0
199,0
200,1
201,0
202,0
203,1
204,1
205,0
206,0
207,0
208,1
209,0
210,0
211,0
212,1
213,0
214,0
215,1
216,0
217,0
218,0
219,0
220,0
221,1
222,0
223,0
224,0
225,0
226,0
227,0
228,0
229,0
230,0
231,0
232,0
233,0
234,0
235,0
236,0
237,0
238,0
239,0
240,0
241,0
242,0
243,0
244,0
245,0
246,0
247,1
248,1
249,1
250,0
251,0
252,0
253,0
254,0
255,0
256,0
257,0
258,0
259,0
260,0
261,0
262,0
263,0
264,0
265,0
266,0
267,0
268,0
269,0
270,0
271,0
272,0
273,0
274,0
275,0
276,0
277,0
278,0
279,0
280,0
281,0
282,0
283,0
284,0
285,0
286,0
287,0
288,0
289,0
290,0
291,0
292,0
293,0
294,0
295,0
296,0
297,0
298,0
299,0
300,0
301,0
302,0
303,0
304,0
305,0
306,0
307,0
308,0
309,0
310,0
311,0
312,0
313,0
314,0
315,0
316,0
317,0
318,0
319,0
320,0
321,1
322,0
323,0
324,0
325,0
326,1
結果
R_HOME:/usr/local/Cellar/r/3.1.2/R.framework/Versions/3.1/Resources
java.library.path:.:/usr/local/Cellar/r/3.1.2/R.framework/Versions/3.1/Resources/library/rJava/jri
a*x+b: a=-0.03550333158708252, b=8.498046248230285  (AIC 1712.5095155708004)
a*x^b: a=39.75900134122691, b=-0.5633965054825036  (AIC 1550.0470141120295)
a*b^x: a=21.2572188567732, b=0.9751177432706232  (AIC 1240.9971794263668)
参考
math/R 3.1.2 をJava 1.8.0_25 から使う (MacOSX 10.10.1 + Homebrew 0.9.5 + Eclipse 4.4.1)
- Homebrew/r-command
$ brew tap homebrew/science
$ brew install r
$ R CMD javareconf JAVA_CPPFLAGS="-I/System/Library/Frameworks/JavaVM.framework/Headers -I/Library/Java/JavaVirtualMachines/jdk1.8.0_25.jdk"
- Eclipse
- Java Projectを作る
- BuildPathに追加する
/usr/local/Cellar/r/3.1.2/R.framework/Versions/3.1/Resources/library/rJava/jri/JRI.jar
- コードを追加する
- src/rJava/RSample.java
- src/rJava/RSample.java
- 一度RSampleをJavaApplicationとして実行してしまって,JavaApplicationの実行パネルを作ってしまう
- RunConfigureから上記で作成されたJavaApplicationのConfigureを選択し,以下を追加する
- Argumentsタブ > "VM arguments:"
-Djava.library.path=.:/usr/local/Cellar/r/3.1.2/R.framework/Versions/3.1/Resources/library/rJava/jri
- Environmentタブ > "Environment variables to set:"
- Variable:
R_HOME
- Value:
/usr/local/Cellar/r/3.1.2/R.framework/Versions/3.1/Resources
- 再度RSampleを実行.
参考
2013年11月14日木曜日
Grails 2.3.2 + GGTS 3.4 環境でgenerate-allしてできたi18nのlang=jaが,上手く表示できなかったのを対応してみたのでメモ
- Grails 2.3.3では文字化けしない.
tumblrにも書いたけど,こちらにもメモ.
アレコレやってみたが上手くいったのはこれ.
- 動機: こちらを参考に作業をしていたら,Grailsのバージョン違いのためか,i18nの関連で文字化けに出会って修正したのでメモ
- 環境: Grails2.3.2+Eclipse4.3(Workspace内の文字コードはUTF-8)+GGTS3.4
- 流れ?:
- Menu/File/New/Grails Project
Project Name: GrailsApp- ContextMenu/Grails Tools/Create Domain Class
name: FileEntry- 編集 'grails-app/domain/grailsapp/FileEntry.groovy'
参考: ' http://www.ntts.co.jp/publish/column/tec/java_02/index_03.html '
- ContextMenu/Grails Tools/Open Grails Command Prompt
grails > generate-all grailsapp.FileEntry- ContextMenu/Grails Tools/Open Grails Command Prompt
grails > run-app- 結果1: ' http://localhost:8080/GrailsApp/fileEntry/index?lang=jp 'にアクセス→文字化け
- responseのheaderに'Content-Type : text/html;charset=ISO-8859-1'という指定がでている
- 対応:
- メソッドを一つ追加 'grails-app/controllers/grailsapp/FileEntryController.groovy'
package grailsapp … class FileEntryController { … def beforeInterceptor = { response.setCharacterEncoding("UTF-8") } … }- 結果2: ' http://localhost:8080/GrailsApp/fileEntry/index?lang=jp 'にアクセス→改善
- responseのheaderに'Content-Type : text/html;charset=UTF-8'で正しい指定になってる
もっと賢い設定があるようにも思う.
2013年10月23日水曜日
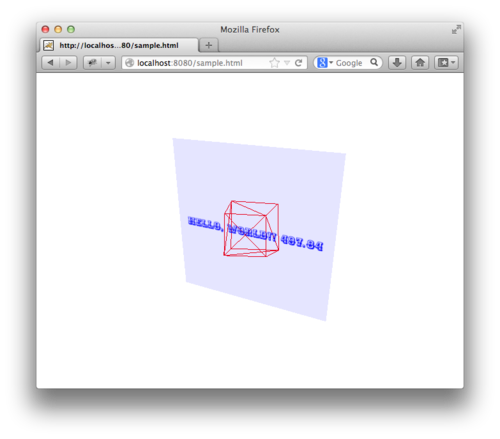
WebGLのTextureをCanvasに文字(Web Fonts)を書いて動的に作ってみる(jQuery/ThreeJS使用, Firefox 24.0/Safari 6.0.5で動作)
tumblrにも書いたが,こっちにも書いておく.
以前にも試みたがリンク先の情報がなくなったりFirefoxでの動作に問題があったりしたので再挑戦.
以前にも試みたがリンク先の情報がなくなったりFirefoxでの動作に問題があったりしたので再挑戦.
<html>
 <head>
  <meta http-equiv="content-type" content="text/html;charset=UTF-8" />
  <link href='http://fonts.googleapis.com/css?family=Ewert' rel='stylesheet' type='text/css'>
  <script src="http://ajax.googleapis.com/ajax/libs/jquery/1.10.2/jquery.min.js" type="text/javascript"></script>
  <script src="http://mrdoob.github.com/three.js/build/three.min.js" type="text/javascript"></script>
  <script type="text/javascript">
   var camera, scene, renderer, mesh, cube;

   function resize() {
    camera.aspect= window.innerWidth / window.innerHeight;
    camera.updateProjectionMatrix();
    renderer.setSize(window.innerWidth, window.innerHeight);
   }

   function animate() {
    requestAnimationFrame(animate);
    var time= Date.now() * 0.001;
    if(mesh) {
     mesh.rotation.x= -time;
     mesh.rotation.y= time;

     var imagedata= createImageData('Hello, World!! ' + (time % 1000).toFixed(2), {
      r: 0,
      g: 0,
      b: 255,
     }, 35);
     var texture= createTexture(imagedata);
     mesh.material.map= texture;
    }
    var time= Date.now() * 0.0005;
    if(cube) {
     cube.rotation.x= time;
     cube.rotation.y= time;
    }
    renderer.render(scene, camera);
   }

   function init() {
    camera= new THREE.PerspectiveCamera(50, window.innerWidth / window.innerHeight, 1, 2000);
    camera.position.z= 10;
    scene= new THREE.Scene();
    scene.add(camera);
    renderer= new THREE.WebGLRenderer({
     antialias: true
    });
    $('#endpoint').append($(renderer.domElement));

    cube= new THREE.Mesh(new THREE.CubeGeometry(1, 1, 1), new THREE.MeshBasicMaterial({
     color: 0xff0000,
     wireframe: true,
    }));
    scene.add(cube);
    cube.scale.x= 2;
    cube.scale.y= 2;
    cube.scale.z= 2;
    cube.position.z= -5;

    var geometry= new THREE.PlaneGeometry(1, 1);
    var material= new THREE.MeshBasicMaterial({
     transparent: true,
    });
    mesh= new THREE.Mesh(geometry, material);
    scene.add(mesh);
    mesh.scale.x= 5;
    mesh.scale.y= 5;
   }

   function createTexture(imagedata) {
    var w= imagedata.width;
    var h= imagedata.height;
    var size= w * h;
    var data= new Uint8Array(4 * size);
    for(var i= 0; i < size; i++) {
     data[i * 4 + 0]= imagedata.data[i * 4 + 0];
     data[i * 4 + 1]= imagedata.data[i * 4 + 1];
     data[i * 4 + 2]= imagedata.data[i * 4 + 2];
     data[i * 4 + 3]= imagedata.data[i * 4 + 3];
    }
    var texture= new THREE.DataTexture(data, w, h, THREE.RGBAFormat);
    texture.needsUpdate= true;
    return texture;
   }

   function createImageData(message, color, fontsize) {
    var c4tex= $('#hiddenCanvas').get(0);
    var w= $(c4tex).width();
    var h= $(c4tex).height();
    var ctx= c4tex.getContext('2d');

    ctx.clearRect(0, 0, w, h);
    ctx.fillStyle= 'rgba(' + color.r + ',' + color.g + ',' + color.b + ',.1)';
    ctx.fillRect(0, 0, w, h);
    ctx.fillStyle= 'rgba(' + color.r + ',' + color.g + ',' + color.b + ',1.0)';
    ctx.font= fontsize + 'px \'Ewert\'';
    ctx.fillText(message, (w - ctx.measureText(message).width) * .5, (h + fontsize) * .5);

    return ctx.getImageData(0, 0, w, h);
   }

   $(document).ready(function() {
    $(window).resize(function() {
     resize();
    });

    init();
    animate();
    resize();
   });
  </script>
 </head>
 <body style="margin: 0; padding: 0;">
  <div id="endpoint"></div>
  <canvas id="hiddenCanvas" width="512" height="512" style="display: none;"></canvas>
 </body>
</html>
- CanvasからtoDataURLメソッドを用いて,Data URI Schemeの形で得た値を返して,THREE.ImageUtils.loadTextureメソッドで生成しようとするとCORS(Cross-Origin Resource Sharing)的問題で引っかかる.
- また,Canvasの2DコンテクストからgetImageDataメソッドを用いて作ったImageData.dataを直接THREE.DataTexture.image.dataに突っ込んでも動作しなかった(私の間違いか,やはりCORS的なナニカか,わからないけど).
2013年10月12日土曜日
先のPOST( SADI service の hello )をTomcatで動かしてみる
参考:
先のPOST
結果:
webapps以下にsaid-servicesを用意して配置

手順:
- ${TOMCAT_HOME}/webappsに'sadi-services'ディレクトリを用意(${TOMCAT_WEBAPPS_SADI-SARVICES}とする)する
- Eclipseのsadi-servicesプロジェクト(${ECLIPSE_SADI-SARVICES}とする)から
'said-services'ディレクトリ(${TOMCAT_WEBAPPS_SADI-SARVICES})に以下を持ってくる
- ${ECLIPSE_SADI-SARVICES}/src/main/webapp/index.jsp
→ ${TOMCAT_WEBAPPS_SADI-SARVICES}/index.jsp- ${ECLIPSE_SADI-SARVICES}/src/main/webapp/WEB-INF
→ ${TOMCAT_WEBAPPS_SADI-SARVICES}/WEB-INF- ${ECLIPSE_SADI-SARVICES}/target/classes
→ ${TOMCAT_WEBAPPS_SADI-SARVICES}/WEB-INF/classes- 'sadi-services'ディレクトリ(${TOMCAT_WEBAPPS_SADI-SARVICES})に
'lib'ディレクトリを用意( ${TOMCAT_WEBAPPS_SADI-SARVICES}/lib )する- 'lib'ディレクトリ( ${TOMCAT_WEBAPPS_SADI-SARVICES}/lib )に上記画像にある各jarを複写する
- それぞれのjarは,先のPOSTを実行しているのであれば,$HOME/.m2/repositoryの下に入っています.
- commons-httpclient-*, xlightweb-*-taverna, xSocket-*は'/sadi-services/hello?xsl'にアクセスしなければ(Firefoxで開かなければ)いらない(かも)
もっと簡単な手順:
- Eclipseのsadi-servicesプロジェクト(${ECLIPSE_SADI-SARVICES}とする)に移る.
$ cd ${ECLIPSE_SADI-SARVICES}- mavenのpackageコマンドを実行する
$ mvn package- targetディレクトリにプロジェクト名のwarができてる.
$ ls target/sadi-services.war- このwarをTomcatのwebappsにおけばTomcatが展開するので,動かせる
(EclipseのJavaとTomcatのJavaのヴァージョンの差異に注意)
$ cp -p target/sadi-services.war ${TOMCAT_HOME}/webapps/
もっとちょっと簡単な手順:
- Eclipseのメニューから'Run > Run Configureations …'を選択
- ダイアログ中,左ペインで'Maven Build'を選択
- ダイアログ中,左ペイン,上部の左隅アイコン('New launch configuration')を押す
- ダイアログ中,左ペイン,'Maven Build > New_configuration (1)'が追加されたので選択
- ダイアログ中,右ペインを編集
- 'Run'を押す
- メニューから'File > Refresh'を選択
- targetディレクトリにプロジェクト名のwar( 'sadi-services.war' )ができてる.
- このwarをTomcatのwebappsにおけばTomcatが展開するので,動かせる
(EclipseのJavaとTomcatのJavaのヴァージョンの差異に注意)

2013年10月11日金曜日
先のPOST( SADI service の hello )のクライアントをJavaで作ってみる
参考:
先のPOST
Build Path周り:
を,含むプロジェクト全体の図.
- それぞれのjarは,先のPOSTを実行しているのであれば,$HOME/.m2/repositoryの下に入っています.
- 面倒なら先のプロジェクトに居候してしまえばパスは通っているので簡単かもしれません.
- コードをパッと見るとsadi-clientとjenaがあればよさそうですが,依存関係の都合で色々いれなくてはなりませんでした.
("slf4j-api-*.jar"だけでなく, "slf4j-log4j12-*.jar"が必要な場合もあるようです)

コード(Client.java):
package sample;

import java.io.File;
import java.io.FileInputStream;
import java.io.IOException;

import ca.wilkinsonlab.sadi.SADIException;
import ca.wilkinsonlab.sadi.client.ServiceImpl;

import com.hp.hpl.jena.rdf.model.Model;
import com.hp.hpl.jena.rdf.model.ModelFactory;
import com.hp.hpl.jena.rdf.model.Resource;
import com.hp.hpl.jena.rdf.model.ResourceFactory;

public class Client {

 public static void main(String[] args) throws SADIException, IOException {
  Model inputModel = ModelFactory.createDefaultModel();
  if (true) {
   Resource type = ResourceFactory
     .createResource("http://sadiframework.org/examples/hello.owl#NamedIndividual");
   Resource s = inputModel
     .createResource(
       "http://sadiframework.org/examples/hello-input.rdf#1",
       type);
   s.addProperty(
     inputModel.createProperty("http://xmlns.com/foaf/0.1/name"),
     "Guy Incognito");
  } else {
   inputModel.read(new FileInputStream(new File("./hello-input.rdf")),
     "", "RDF/XML");
  }
  inputModel.write(System.out, "RDF/XML");

  String serviceURI = "http://localhost:8080/sadi-services/hello";
  ServiceImpl service = new ServiceImpl(serviceURI);

  Model outputModel = service.invokeServiceUnparsed(inputModel);
  outputModel.write(System.out, "RDF/XML");
 }
}
結果:
当たり前だけど, service側が動いている前提です.
<rdf:RDF
    xmlns:rdf="http://www.w3.org/1999/02/22-rdf-syntax-ns#"
    xmlns:j.0="http://xmlns.com/foaf/0.1/"
    xmlns:j.1="http://sadiframework.org/examples/hello.owl#" >
  <rdf:Description rdf:about="http://sadiframework.org/examples/hello-input.rdf#1">
    <j.0:name>Guy Incognito</j.0:name>
    <rdf:type rdf:resource="http://sadiframework.org/examples/hello.owl#NamedIndividual"/>
  </rdf:Description>
</rdf:RDF>
<rdf:RDF
    xmlns:rdf="http://www.w3.org/1999/02/22-rdf-syntax-ns#"
    xmlns:j.0="http://sadiframework.org/examples/hello.owl#" >
  <rdf:Description rdf:about="http://sadiframework.org/examples/hello-input.rdf#1">
    <j.0:greeting>Hello, Guy Incognito!</j.0:greeting>
    <rdf:type rdf:resource="http://sadiframework.org/examples/hello.owl#GreetedIndividual"/>
  </rdf:Description>
</rdf:RDF>
先のPOST( SADI service の hello )から真似っこだけで,数値2入力の足し算サービスを追加してみる
Owlを用意( ./sample.owl ):
てきとーに書いてみた(後の行程からみて間違ってるかも).
<rdf:RDF
    xmlns:rdf="http://www.w3.org/1999/02/22-rdf-syntax-ns#"
    xmlns:rdfs="http://www.w3.org/2000/01/rdf-schema#"
    xmlns:owl="http://www.w3.org/2002/07/owl#">

  <owl:Ontology rdf:about="">
  </owl:Ontology>

  <owl:Class rdf:ID="inputValues">
    <owl:equivalentClass>
      <owl:Restriction>
        <owl:onProperty rdf:resource="#number1"/>
        <owl:someValuesFrom rdf:resource="http://www.w3.org/2001/XMLSchema#int"/>
      </owl:Restriction>
    </owl:equivalentClass>
    <owl:equivalentClass>
      <owl:Restriction>
        <owl:onProperty rdf:resource="#number2"/>
        <owl:someValuesFrom rdf:resource="http://www.w3.org/2001/XMLSchema#int"/>
      </owl:Restriction>
    </owl:equivalentClass>
  </owl:Class>

  <owl:Class rdf:ID="outputValue">
    <owl:equivalentClass>
      <owl:Restriction>
        <owl:onProperty rdf:resource="#result"/>
        <owl:someValuesFrom rdf:resource="http://www.w3.org/2001/XMLSchema#int"/>
      </owl:Restriction>
    </owl:equivalentClass>
  </owl:Class>

</rdf:RDF>
サービスのコードを生成する:
やり方は先のPOST参照のこと.パラメータは以下の通り.
serviceName : add
serviceClass: com.example.AddService
inputClass  : file:./sample.owl#inputValues
outputClass : file:./sample.owl#outputValue
contactEmail: your-email-address (そのままでも実行できる / エンドポイントにて連絡先として公開される)
サービスのコードを修正・実装する:
AddService.java中の'static final class Vocab {'を修正する.
- 'public static final Resource int ='と変数名が型になってしまったので'int'を'intType'と変更
 static final class Vocab {
  private static Model m_model = ModelFactory.createDefaultModel();

  public static final Property result = m_model
    .createProperty("file:./sample.owl#result");
  public static final Property number1 = m_model
    .createProperty("file:./sample.owl#number1");
  public static final Property number2 = m_model
    .createProperty("file:./sample.owl#number2");
  public static final Resource outputValue = m_model
    .createResource("file:./sample.owl#outputValue");
  public static final Resource intType = m_model
    .createResource("http://www.w3.org/2001/XMLSchema#int");
  public static final Resource inputValues = m_model
    .createResource("file:./sample.owl#inputValues");
 }
AddService.java中の'public void processInput(Resource input, Resource output)'を実装する.
 public void processInput(Resource input, Resource output)
 {
  int n1 = input.getProperty(Vocab.number1).getInt();
  int n2 = input.getProperty(Vocab.number2).getInt();
  int result = n1 + n2;
  output.addProperty(Vocab.result, result + "");
 }
サービスを起動する:
やり方は先のPOST参照のこと.
Firefoxでアクセスすると( http://localhost:8080/sadi-services/add ):

curlを使ってアクセスしてみる:
$ cat add-input.rdf
<rdf:RDF
    xmlns:rdf="http://www.w3.org/1999/02/22-rdf-syntax-ns#"
    xmlns:sample="file:./sample.owl#">

 <sample:inputValues rdf:about="file:./sample.owl#1">
  <sample:number1>1000000000</sample:number1>
  <sample:number2>20</sample:number2>
 </sample:inputValues>

</rdf:RDF>
$ curl -d '@add-input.rdf' http://localhost:8080/sadi-services/add
<rdf:RDF
    xmlns:rdf="http://www.w3.org/1999/02/22-rdf-syntax-ns#"
    xmlns:j.0="file:./sample.owl#">
  <j.0:outputValue rdf:about="file:./sample.owl#1">
    <j.0:result>1000000020</j.0:result>
  </j.0:outputValue>
</rdf:RDF>
SADI (Semantic Automated Discovery and Integration) の service skeleton (Java) を試す(Eclipse+m2e環境で)
参考:
Generating the SADI service code / BuildingServicesInJava / Tutorial: building a SADI service in Java.
環境:
- Mavenを使えるようにした(m2eプラグインだったと思う)Eclipse(Kepler/4.3)
- m2eのupdate site情報
ダウンロード:
- sadi-service-skeleton-*.zip (今回は sadi-service-skeleton-0.1.1-e3.7.zip )をダウンロード
プロジェクトを作る:
- メニューから'File > Import'を選択
- ダイアログ中から'Existing Projects into Workspace'を選択
- ダイアログ中の'Select archive file:'にdownloadした'sadi-service-skeleton-*.zip'を設定
- ダイアログ中の'Finish'ボタンを押す.

サービスのコードを生成する:
- メニューから'Run > Run Configurations …'を選択
- ダイアログ中,左ペインから'Maven Build > generate sadi service'を選択
- ダイアログ中,右ペインのパラメタを修正
serviceName : hello
serviceClass: com.example.HelloWorldService
inputClass  : http://sadiframework.org/examples/hello.owl#NamedIndividual
outputClass : http://sadiframework.org/examples/hello.owl#GreetedIndividual
contactEmail: your-email-address (そのままでも実行はできる / エンドポイントにて連絡先として公開される)
(コピペ等で最初や最後に空白が入っていると失敗します)
- ダイアログ中の'Run'ボタンを押す
- 生成ファイルを確認するためにメニューから'File > Refresh'を選択
- ファイルを確認
src/main/javaにcom.exampleパッケージのHelloWorldService.javaができている.
src/main/webapp/WEB-INF/web.xmlが作られ(無い場合),hello Servletの設定が追加されている.
src/main/webapp/index.jspが作られ(無い場合),“./hello”へのリンク(サービスのエンドポイント)が追加されている.
- ちなみに http://sadiframework.org/examples/hello.owl の中身はこんなの
<rdf:RDF
    xmlns:rdf="http://www.w3.org/1999/02/22-rdf-syntax-ns#"
    xmlns:rdfs="http://www.w3.org/2000/01/rdf-schema#"
    xmlns:owl="http://www.w3.org/2002/07/owl#">

  <owl:Ontology rdf:about="">
  </owl:Ontology>

  <owl:DatatypeProperty rdf:about="http://xmlns.com/foaf/0.1/name">
   <rdfs:isDefinedBy rdf:resource="http://xmlns.com/foaf/0.1/index.rdf"/>
  </owl:DatatypeProperty>

  <owl:DatatypeProperty rdf:about="#greeting"/>

  <owl:Class rdf:ID="NamedIndividual">
    <owl:equivalentClass>
      <owl:Restriction>
        <owl:onProperty rdf:resource="http://xmlns.com/foaf/0.1/name"/>
        <owl:minCardinality rdf:datatype="http://www.w3.org/2001/XMLSchema#int">1</owl:minCardinality>
      </owl:Restriction>
    </owl:equivalentClass>
  </owl:Class>

  <owl:Class rdf:ID="GreetedIndividual">
    <owl:equivalentClass>
      <owl:Restriction>
        <owl:onProperty rdf:resource="#greeting"/>
        <owl:someValuesFrom rdf:resource="http://www.w3.org/2001/XMLSchema#string"/>
      </owl:Restriction>
    </owl:equivalentClass>
  </owl:Class>

  <owl:DatatypeProperty rdf:about="#lang"/>

  <owl:Class rdf:ID="SecondaryParameters">
    <owl:equivalentClass>
      <owl:Restriction>
        <owl:onProperty rdf:resource="#lang"/>
        <owl:minCardinality rdf:datatype="http://www.w3.org/2001/XMLSchema#int">1</owl:minCardinality>
      </owl:Restriction>
    </owl:equivalentClass>
  </owl:Class>

</rdf:RDF>


サービスのコードを実装する:
HelloWorldService.java中の'public void processInput(Resource input, Resource output)'を実装する.
 public void processInput(Resource input, Resource output)
 {
  String name = input.getProperty(Vocab.name).getString();
  output.addProperty(Vocab.greeting, String.format("Hello, %s!", name));
 }
サービスを起動する:
これでサービスの開始.
- メニューから'Run > Run Configurations …'を選択
- ダイアログ中,左ペインから'Maven Build > run sadi services in Jetty'を選択
- ダイアログ中,'Run'ボタンを押す
Firefoxでアクセスした場合( http://localhost:8080/sadi-services/hello ):
Safariでアクセスした場合はRDFが返ってくる:
<?xml version="1.0" encoding="UTF-8" ?>
<?xml-stylesheet type="text/xsl" href="?xsl" ?>
<rdf:RDF
    xmlns:rdf="http://www.w3.org/1999/02/22-rdf-syntax-ns#"
    xmlns:mygrid="http://www.mygrid.org.uk/mygrid-moby-service#"
    xmlns:j.0="http://protege.stanford.edu/plugins/owl/dc/protege-dc.owl#"
    xmlns:rdfs="http://www.w3.org/2000/01/rdf-schema#">
  <mygrid:serviceDescription rdf:about="">
    <mygrid:hasOperation>
      <mygrid:operation>
        <mygrid:outputParameter>
          <mygrid:parameter>
            <mygrid:objectType rdf:resource="http://sadiframework.org/examples/hello.owl#GreetedIndividual"/>
          </mygrid:parameter>
        </mygrid:outputParameter>
        <mygrid:inputParameter>
          <mygrid:parameter>
            <mygrid:objectType rdf:resource="http://sadiframework.org/examples/hello.owl#NamedIndividual"/>
          </mygrid:parameter>
        </mygrid:inputParameter>
      </mygrid:operation>
    </mygrid:hasOperation>
    <mygrid:providedBy>
      <mygrid:organisation>
        <mygrid:authoritative rdf:datatype="http://www.w3.org/2001/XMLSchema#boolean"
        >false</mygrid:authoritative>
        <j.0:creator rdf:datatype="http://www.w3.org/2001/XMLSchema#string"
        >your-email-address</j.0:creator>
      </mygrid:organisation>
    </mygrid:providedBy>
    <rdfs:label rdf:datatype="http://www.w3.org/2001/XMLSchema#string"
    >hello</rdfs:label>
    <mygrid:hasServiceNameText rdf:datatype="http://www.w3.org/2001/XMLSchema#string"
    >hello</mygrid:hasServiceNameText>
  </mygrid:serviceDescription>
</rdf:RDF>


比較テストがあるのでやってみる:
上手く行けばConsoleに'[INFO] BUILD SUCCESS'と出ている.
- メニューから'Run > Run Configurations …'を選択
- ダイアログ中,左ペインから'Maven Build > test sadi service'を選択
- ダイアログ中,右ペインのパラメタを修正
serviceURL: http://localhost:8080/sadi-services/hello
input     : http://sadiframework.org/test/hello-input.rdf
expected  : http://sadiframework.org/test/hello-output.rdf (比較対象/予定されている出力(を,
Modle.write()で書き出し直したモノ)
- ちなみにhello-input.rdfの中身はこんなの
<rdf:RDF
    xmlns:rdf="http://www.w3.org/1999/02/22-rdf-syntax-ns#"
    xmlns:foaf="http://xmlns.com/foaf/0.1/"
    xmlns:hello="http://sadiframework.org/examples/hello.owl#">

 <hello:NamedIndividual rdf:about="http://sadiframework.org/examples/hello-input.rdf#1">
  <foaf:name>Guy Incognito</foaf:name>
 </hello:NamedIndividual>

</rdf:RDF>
さらにちなむと,これをcom.hp.hpl.jena.rdf.model.Modelのreadメソッド読み込んでwriteメソッドで書き出すと以下のようになる.
<rdf:RDF xmlns:rdf="http://www.w3.org/1999/02/22-rdf-syntax-ns#" xmlns:foaf="http://xmlns.com/foaf/0.1/" xmlns:hello="http://sadiframework.org/examples/hello.owl#" > <rdf:Description rdf:about="http://sadiframework.org/examples/hello-input.rdf#1"> <foaf:name>Guy Incognito</foaf:name> <rdf:type rdf:resource="http://sadiframework.org/examples/hello.owl#NamedIndividual"/> </rdf:Description> </rdf:RDF>- ちなみにhello-output.rdfの中身はこんなの
<rdf:RDF xmlns:rdf="http://www.w3.org/1999/02/22-rdf-syntax-ns#" xmlns:j.0="http://sadiframework.org/examples/hello.owl#" > <rdf:Description rdf:about="http://sadiframework.org/examples/hello-input.rdf#1"> <j.0:greeting>Hello, Guy Incognito!</j.0:greeting> <rdf:type rdf:resource="http://sadiframework.org/examples/hello.owl#GreetedIndividual"/> </rdf:Description> </rdf:RDF>- ダイアログ中,'Run'ボタンを押す


curlを使ってアクセスしてみる:
$ cat hello-input.rdf
<rdf:RDF
    xmlns:rdf="http://www.w3.org/1999/02/22-rdf-syntax-ns#"
    xmlns:foaf="http://xmlns.com/foaf/0.1/"
    xmlns:hello="http://sadiframework.org/examples/hello.owl#">

 <hello:NamedIndividual rdf:about="http://sadiframework.org/examples/hello-input.rdf#1">
  <foaf:name>Guy Incognito</foaf:name>
 </hello:NamedIndividual>

</rdf:RDF>
$ curl -d '@hello-input.rdf' http://localhost:8080/sadi-services/hello
<rdf:RDF
    xmlns:rdf="http://www.w3.org/1999/02/22-rdf-syntax-ns#"
    xmlns:j.0="http://sadiframework.org/examples/hello.owl#">
  <j.0:GreetedIndividual rdf:about="http://sadiframework.org/examples/hello-input.rdf#1">
    <j.0:greeting>Hello, Guy Incognito!</j.0:greeting>
  </j.0:GreetedIndividual>
</rdf:RDF>
2回分並べて入力してみる:
$ cat hello-input2.rdf
<rdf:RDF
    xmlns:rdf="http://www.w3.org/1999/02/22-rdf-syntax-ns#"
    xmlns:foaf="http://xmlns.com/foaf/0.1/"
    xmlns:hello="http://sadiframework.org/examples/hello.owl#">

 <hello:NamedIndividual rdf:about="http://sadiframework.org/examples/hello-input.rdf#1">
  <foaf:name>Guy Incognito</foaf:name>
 </hello:NamedIndividual>

 <hello:NamedIndividual rdf:about="http://sadiframework.org/examples/hello-input.rdf#2">
  <foaf:name>Gal Incognito</foaf:name>
 </hello:NamedIndividual>

</rdf:RDF>
$ curl -d '@hello-input2.rdf' http://localhost:8080/sadi-services/hello
<rdf:RDF
    xmlns:rdf="http://www.w3.org/1999/02/22-rdf-syntax-ns#"
    xmlns:j.0="http://sadiframework.org/examples/hello.owl#">
  <j.0:GreetedIndividual rdf:about="http://sadiframework.org/examples/hello-input.rdf#2">
    <j.0:greeting>Hello, Gal Incognito!</j.0:greeting>
  </j.0:GreetedIndividual>
  <j.0:GreetedIndividual rdf:about="http://sadiframework.org/examples/hello-input.rdf#1">
    <j.0:greeting>Hello, Guy Incognito!</j.0:greeting>
  </j.0:GreetedIndividual>
</rdf:RDF>
2013年9月25日水曜日
MacOSX プレビューにてJPEGをPDFにする際のファイルサイズが異様に大きいことへの対策
tumblrにも書きましたがこちらにもメモ.
基本
- 書き出し時にQuartzフィルタの'Reduce File Size'を指定してあげる.
- ただし'プレビュー'のフィルタではサンプリングが荒すぎて使い物にならないことがある.
対策
- そこで'ColorSync ユーティリティ'を用いる.
準備
- ColorSync ユーティリティを開く
- 'フィルタ'タブを開く.
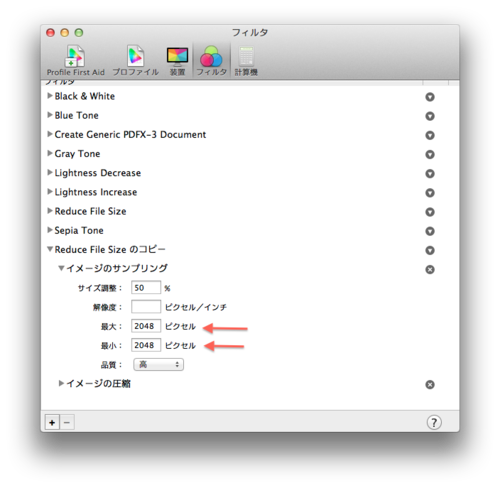
- 'Reduce File Size'フィルタのコピーを作る('Reduce File Size のコピー').
- 'イメージのサンプリング'の最大, 最少を1024や2048等にする.
変換
- 対象JPGをColorSyncユーティリティで開く(プレビューではない).
- 'ファイル/書き出す…'を選ぶ(保存ではない).
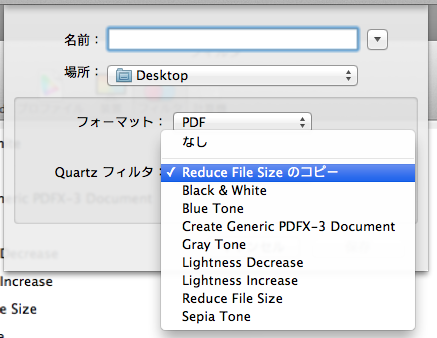
- '名前'を任意に入力する.
- フォーマットをPDFにする.
- Quartz フィルタを上記作成のモノにする('Reduce File Size のコピー')
- '保存'を押す.
2013年9月18日水曜日
AppleScript / ハンドメイドクッキーを自動で焼く
フト,思い立って試みた.
参考
あらゆる操作を実行可能マウスカーソルを動かす方法いろいろ - ザリガニが見ていた...。
やったこと と 結果
参考にあるが,“目標の座標は、画面左上を原点(0, 0)とした絶対座標で指定する。”です.Window単位ではないので注意.tell application "System Events" tell process "Safari" repeat with i from 1 to 100000 click at {150, 400} end repeat end tell end tell
システム環境設定で以下の設定をしないと有効にならないのでこちらも注意が必要


2013年6月13日木曜日
ruby gem 'aruduino_firmata'のsysexを用いたI2C通信(温度センサと気圧センサ)でのlinda-arduino-sensor的なもの
2013/06/14-18:11JST u2sで負の値の求め方の間違いを修正(緑色)これまでの記事(APT7410とMPL115A2)でのコードを利用したlinda-arduino-sensor的なもの
2013/06/14-13:30JST 返り値のバイト数が要求バイト数と合っていないことがあるのでその場合スキップするように修正(赤色)
気圧の値も妥当なものになった(と思う).

#!/usr/bin/env ruby
require 'rubygems'
require 'sinatra/rocketio/linda/client'
require 'arduino_firmata'
$stdout.sync = true

url   = ENV["LINDA_BASE"]  || ARGV.shift || "http://localhost:5000"
space = ENV["LINDA_SPACE"] || "test"
linda = Sinatra::RocketIO::Linda::Client.new url
ts = linda.tuplespace[space]

linda.io.on :connect do  ## RocketIO's "connect" event
  puts "connect!! <#{linda.io.session}> (#{linda.io.type})"
end

linda.io.on :disconnect do
  puts "RocketIO disconnected.."
end

STRING_DATA= 0x71
I2C_REQUEST= 0x76
I2C_REPLY= 0x77
I2C_CONFIG= 0x78

_WRITE= 0x00
_READ= 0x08

ADDRESS_ADT7410= 0x48
ADDRESS_MPL115A2= 0x60

#MPL115A2 coefficients
a0= b1= b2= c12= 0.0

def readByte(data, pos)
  return data[pos]+data[pos+1]*(1<<7)
end

def readData(msb, lsb)
  return (msb<<8)+lsb
end

def u2s(v)
  return (v<(1<<15)) ? v : v-(1<<15)*2
end

def bytes2str(bytes)
  ret= ''
  bytes.each do |o|
    ret+= o.chr
  end
  return ret;
end

def decodeData(data)
  ret= {}
  ret[:address]= readByte(data, 0) if (data.length>1)
  ret[:register]= readByte(data, 2) if (data.length>3)
  ary= [];
  i= 4
  while i+1<data.length
    ary.push( readByte(data, i))
    i+= 2
  end
  ret[:data]= ary
  return ret;
end

arduino = ArduinoFirmata.connect ENV["ARDUINO"], :nonblock_io => true

arduino.on :sysex do |command, data|
  #puts "command : #{command}"
  #puts "data    : #{data.inspect}"
  data= (command == STRING_DATA) ? bytes2str(data) : decodeData(data)
  if command == STRING_DATA
    p data
  elsif command == I2C_REPLY
    if data[:address] == ADDRESS_ADT7410
      if data[:data].length == 2
        tout= u2s(readData(data[:data][0], data[:data][1])) / (1<<7).to_f
        ts.write ["sensor", "temperature", tout]
      end
    elsif data[:address] == ADDRESS_MPL115A2
      if data[:register] == 0x04
        if data[:data].length == 8
          a0 = u2s(readData(data[:data][0], data[:data][1]))/(1<< 3).to_f
          b1 = u2s(readData(data[:data][2], data[:data][3]))/(1<<13).to_f
          b2 = u2s(readData(data[:data][4], data[:data][5]))/(1<<14).to_f
          c12= u2s(readData(data[:data][6], data[:data][7]))/(1<<24).to_f
        end
      elsif data[:register] == 0x00
        if data[:data].length == 4
          padc= readData(data[:data][0], data[:data][1])>>6
          tadc= readData(data[:data][2], data[:data][3])>>6
          pcomp= a0 + ( b1 + c12 * tadc ) * padc + b2 * tadc
          pout= pcomp * 650.0/1023.0 + 500.0
          ts.write ["sensor", "pressure", pout] if padc>0
        end
      end
    end
  end
end

#i2c enable
arduino.sysex I2C_CONFIG, [0x00, 0x00]

#APT7410 16bit mode
arduino.sysex I2C_REQUEST, [ADDRESS_ADT7410, _WRITE, 0x03, 0x00, 0x00, 0x01]

#MPL115A2 coefficients
arduino.sysex I2C_REQUEST, [ADDRESS_MPL115A2, _READ, 0x04, 0x00, 0x08, 0x00]

loop do
  arduino.sysex I2C_REQUEST, [ADDRESS_ADT7410, _READ, 0x00, 0x00, 0x02, 0x00]

  arduino.sysex I2C_REQUEST, [ADDRESS_MPL115A2, _WRITE, 0x12, 0x00, 0x01, 0x00]
  sleep 0.02
  arduino.sysex I2C_REQUEST, [ADDRESS_MPL115A2, _READ, 0x00, 0x00, 0x04, 0x00]

  sleep 1
end
ruby gem 'arduino_firmata' の sysex を使ってMPL115A2使用の圧力モジュールから値を取得する
2013/06/14-18:11JST u2sで負の値の求め方の間違いを修正(緑色)
2013/06/14-13:30JST 返り値のバイト数が要求バイト数と合っていないことがあるのでその場合スキップするように修正(青色)
気圧の値も妥当なものになった(と思う).
2013/06/13-16:10JST ADT7410(温度)/"arduino.sysex I2C_REQUEST, [ADDRESS_ADT7410, _WRITE, 0x03, 0x00, 0x00, 0x001]"で16bit-modeで動くこともあるが, ケースによっては13bitのままだったりする.
2013/06/13-15:36JST ADT7410(温度)/16bit mode指定がやっぱり正しく動いてないので削除
- 0.1度の中に複数の計測点があるので16bit modeであることがわかる.
- 気圧/MPL115A2側はパスコン入れたら安定した
2013/06/13-15:06JST ADT7410(温度)/16bit mode指定の間違いを訂正

結果:
ブレッドボードをMBPの上からおろしたらみるみる温度が下がっていく図.
気圧が安定していない…やっぱりなにか間違っているのかもしれない.

これを使って,やってみた.のでメモ.
#!/usr/bin/env ruby -Ku
require 'rubygems'
require 'arduino_firmata'
$stdout.sync = true

STRING_DATA= 0x71
I2C_REQUEST= 0x76
I2C_REPLY= 0x77
I2C_CONFIG= 0x78

_WRITE= 0x00
_READ= 0x08

ADDRESS_ADT7410= 0x48
ADDRESS_MPL115A2= 0x60

#MPL115A2 coefficients
a0= b1= b2= c12= 0.0

def readData(data, shift)
  msb= data[4+4*shift]+data[5+4*shift]*128
  lsb= data[6+4*shift]+data[7+4*shift]*128
  return (msb<<8)+lsb
end

def readDataS(data, shift)
  v= readData(data, shift)
  return (v<(1<<15)) ? v : v-(1<<15)*2
end

def data2string(data)
  i=0
  msg= ''
  while i+1<data.length
    msg+= data[i].chr
    i+= 2
  end
  return msg;
end

arduino = ArduinoFirmata.connect ENV["ARDUINO"], :nonblock_io => true

arduino.on :sysex do |command, data|
  puts "command : #{command}"
  puts "data    : #{data.inspect}"
  if command == I2C_REPLY
    if data[0] == ADDRESS_ADT7410
      if data.length == 8
        tout= readDataS(data, 0)/(1<<7).to_f
        puts "気温 #{tout} ℃"
      end
    elsif data[0] == ADDRESS_MPL115A2
      if data[2] == 0x04
        if data.length == 20
          a0 = readDataS(data, 0)/(1<<3).to_f
          b1 = readDataS(data, 1)/(1<<13).to_f
          b2 = readDataS(data, 2)/(1<<14).to_f
          c12= readDataS(data, 3)/(1<<24).to_f
        end
      elsif data[2] == 0x00
        if data.length == 12
          padc= readData(data, 0)>>6
          tadc= readData(data, 1)>>6
          pcomp= a0 + ( b1 + c12 * tadc ) * padc + b2 * tadc
          pout= pcomp * 650.0/1023.0 + 500.0
          puts "気圧 #{pout} hPa"
        end
      end
    end
  else
    if command == STRING_DATA
      p data2string(data);
    end
  end
end

#i2c enable
arduino.sysex I2C_CONFIG, [0x00, 0x00]

#MPL115A2 coefficients
arduino.sysex I2C_REQUEST, [ADDRESS_MPL115A2, _READ, 0x04, 0x00, 0x08, 0x00]

loop do
  arduino.sysex I2C_REQUEST, [ADDRESS_ADT7410, _READ, 0x00, 0x00, 0x02, 0x00]

  arduino.sysex I2C_REQUEST, [ADDRESS_MPL115A2, _WRITE, 0x12, 0x00, 0x01, 0x00]
  sleep 0.02
  arduino.sysex I2C_REQUEST, [ADDRESS_MPL115A2, _READ, 0x00, 0x00, 0x04, 0x00]

  sleep 1
end
- 前の記事の最後に書いた,「うまくいかない.」の原因は,1バイト(8ビット)の内容を送るのにも7bitの通信なので2バイト(7ビットのバイト+1ビットのバイト)送らないといけない(受信も)という点を全く理解していなかったのに挑んでいたのが原因.…だったと思っている(結局よくわかっていない).
登録:
投稿 (Atom)